Hello guys, in this tutorial we are going to learn about Setting Bundle, and how to implement and used it in the iOS Application.
Introduction and Preference Types
iOS foundation framework provides a low-level mechanism to store data preferences. The Setting bundle is used to display and manage preferences in the settings app, using it we can add UI elements in the settings app and configuring preferences for use inside your application. Setting Bundle’s data is managed by the User Default.
Following are the list of control types available in Settings Bundle:-
1) Text Field
The Text field type is used to display title and input field. When you want to get the custom string value from the user you can use this type of preferences.

Key Identifier
Properties
Type: This property is used to set the type of preferences. E.g Title, TextField, Toggle Switch, Slider, Multi-value, Group, Child Pane. This key is required.
Title: Title is used to display the title of the text-field which is displayed left side of the text fields.
Identifier: Identifier is the id which is unique, Identifier is used to save and retrieve data of text field.
IsSecure: If you can set yes then text field is a password entry field, which displays inputted text as bullet characters. If you can set no than the text field is a standard text field which displays a typed text.
KeyboardType: This property is used to set the type of keyboard. E.g. Alphabet, NumbersAndPunctuation, NumberPad, URL, EmailAddress.The default value of keyboard type is Alphabet.
AutocapitalizationType: This property is used to apply autocapitalization style to enter text. E.g. None, Sentences, Words, All Characters. The default value of keyboard type is None.
AutocorrectionType: This property is used to apply autocorrection in textfield. The default value is True.
2) Title
The Title element is used to display a read-only string. You can use it to display information about the configuration.

Key Identifier
You can set PSTitleValueSpecifier identifier in the plist file.
Properties
Title: Title means you give the value(in text) of the title field.
DefaultValue: This property is used to set the default value of the Title. This key is required
Identifier: Identifier is the id which is unique, Identifier is used to save and retrieve the value of Preference.
3) Toggle switch:
The toggle switch is used to display ON/OFF button in the setting of the app. You can use this type of element where one of the two value is required.

Key Identifier
You can set PSToggleSwitchSpecifier identifier in the plist file.
Properties
Title: Title is used to display the title of the Toggle switch, which is display left side of the value. This key is required
DefaultValue: This property is to set default boolean value. E.g ON/OFF. This key is compulsory.
4) Slider
The Slider is used to display slider control in your configuration. In this control, you need to give a minimum and a maximum value of the range.

Key Identifier
You can set PSSliderSpecifier identifier in the plist file.
Properties
MinimumValue: This property is to set minimum value of the slider. This key is compulsory.
MaximumValue: This property is to set a maximum value of the slider. This key is compulsory.
MinimumValueImage: This property is to set image for representing minimum value of the slider. The image should be 21 by 21 pixel.
MaximumValueImage: This property is to set image for representing a maximum value of the slider. The image should be 21 by 21 pixel.
5) Multi Value
The Multi-value preference we can use to display a list of values and user can select a value from the list. You can set this type of preference to choose a value from a list of values. When you select preference of multi-value, the setting app displays a new page with the list of values to choose from. once the user selects any value from that list it will return to the previous page. The selected value is display in the preference row.

Key Identifier
You can set PSMultiValueSpecifier identifier in the plist file.
Properties
Values: An array of that contains the set of values that can be used to choose from. you can use any type which supported by preference file. this key is required.
Titles: This property is to set a maximum value of the slider. This key is compulsory.
(Note: The title and values must be equal.)
6) Group
The Group preference is used to display the title of the preferences on a page that visualize a group of the element. This element should be placed in front of the preferences associated with the group.

Key Identifier
You can set PSGroupSpecifier identifier in the plist file.
Properties
Title: This property is used to set a title of the group. If this property is not assigned it will insert a gap between preferences.FooterText: This property is used to set footer text in the group. It is additional text to display in the Group preference.
7) Child Pane:
The child pane element is used to display preference row when user tap on it it will be loaded a new page of preferences.you can use this type to create a hierarchy of pages of preferences.

Key Identifier
You can set PSChildPaneSpecifier identifier in the plist file.
Properties
Title: This property is used to display the title of preferences row.
File: In this property you need a set name of the schema which you would like to load. This file must be a .plist file. This key is compulsory.
How to implement Setting Bundle in iOS Application
Let’s discuss how to implement setting bundle in iOS Application.
First of all, we need to create a single view Xcode project. You can download the startup project here.
Now we will add the setting bundle in the project.
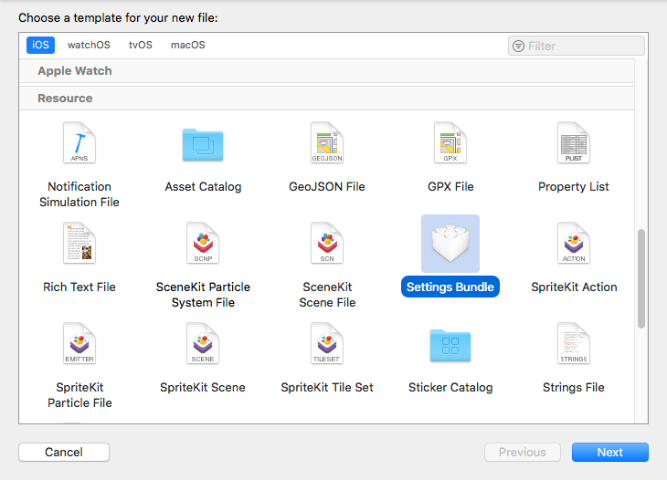
1. File => New => New File
2. Select The Setting Bundle template which is available under Resource of the iOS tab. like display in figure below,
3. Give the file name Setting.bundle.
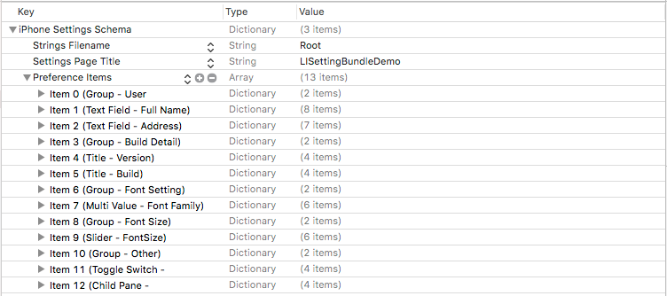
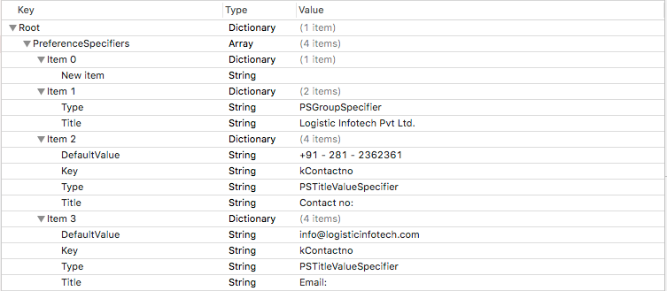
After adding setting bundle in the project we have to set configuration based on the requirement in Root.plist. Here we add another .plist with name ContactUs.plist which we will use to open another screen from the main setting page using child pane.
Example Root.plist file
Example ContactUS.plist file
After adding the Setting Bundle and Configure .plist file in project we are going to configure code for retrieve and add the value of the Setting bundle components.
Create a helper class for the setting bundle.
Create setting bundle helper class named SettingBundleWrapper.swift. It will be used to register setting bundle and handle setting bundle data.
Insert values of the setting bundle
We can set value of setting bundle using the identifier key of components. Here, we set the app info in setting app. Following code describe how to set value of setting bundle.
1. create structure for a Setting Bundle key constant inside SettingBundleWrapper Class.
SettingsBundleKeyConstant {
        static let BuildVersionKey = "kVersion"
        static let AppVersionKey = "kBuildNumber"
    }
2. Get value from info plist and set in the setting bundle.
I) Create variable mainBundleDict and set info plist values in SettingBundleWrapper.swift.
var mainBundleDict: [String: Any]?

    func setMainBundle() {
        if mainBundleDict == nil {
            if let dict = Bundle.main.infoDictionary {
                mainBundleDict = dict
            }
        }
    }
II) Get build information from mainBundle object and set in setting bundle.
func setBuildInfo() {
        guard let appVersion = mainBundleDict?[String(kCFBundleVersionKey)] as? String else { return }
        guard let appBuildNumber = mainBundleDict?["CFBundleShortVersionString"] as? String else { return }
        userDefaults.set(appVersion, forKey: SettingsBundleKeyConstant.AppVersionKey)
        userDefaults.set(appBuildNumber, forKey: SettingsBundleKeyConstant.BuildVersionKey)
    }
III)After creating above method call from init() method, so now init() will look like below.
private init() {
        setMainBundle()
    }
IV) Call setBuildInfo() method from applicationDidBecomeActive method AppDelegate.
func applicationDidBecomeActive(_ application: UIApplication) {
        SettingBundleWrapper.shared.setBuildInfo()
    }
Fetch data from SettingBundle
I) Register Setting Bundle.
It is important to configure user default setting when we work with Setting Bundle. So that it will return the perfect default value. It performs every time of app launch. Let’s register setting bundle, To register setting bundle we create below method in SettingBundleWrapper.swift class.
Below method is called from init() of the SettingBundleWrapper.swift class.
let userDefaults = UserDefaults.standard

	func configureSettingsBundle() {

        	guard let settingsBundle = Bundle.main.url(forResource: "Settings", withExtension:"bundle") else {
            print("Settings.bundle not found")
            return;
        }

        guard let settings = NSDictionary(contentsOf: settingsBundle.appendingPathComponent("Root.plist")) else {
            print("Root.plist not found in settings bundle")
            return
        }

        guard let preferences = settings.object(forKey: "PreferenceSpecifiers") as? [[String: AnyObject]] else {
            print("Root.plist has invalid format")
            return
        }

        var defaultsToRegister = [String: AnyObject]()
        for var pref in preferences {
            if let key = pref["Key"] as? String, let val = pref["DefaultValue"] {
                print("\(key)==> \(val)")
                defaultsToRegister[key] = val
            }
        }
        userDefaults.register(defaults: defaultsToRegister)
    }
II) Add Observer.
After register setting bundle we add an observer to notify setting bundle value has been changed. We add observer in viewWillAppear of the ViewController.swift file.
override func viewDidAppear(_ animated: Bool) {
        NotificationCenter.default.addObserver(self, selector: #selector(fetchSettingBundleData), name: UserDefaults.didChangeNotification, object: nil)
    }
III) Fetch Value from Setting Bundle
After registering setting bundle and add observer we can fetch the value of setting bundle using below method of user default.
UserDefault.standard.value(forkey:KEY)
Where KEY must be pass as identifier of any setting bundle component.
var backGroundColor:UIColor = UIColor.white
    var fontColor:UIColor = UIColor.black
    var fontName:String = "Arial"
    var fontSize:CGFloat = 10
    var fullName = "N/A"
    var userAddress = "N/A"

    @objc func fetchSettingBundleData(){


        let userDefault = UserDefaults.standard
        //Fetch value from Setting bundle

        if userDefault.bool(forKey: "kDarkThene") {
            backGroundColor = UIColor.black
            fontColor = UIColor.white
        }
        else{
            backGroundColor = UIColor.white
            fontColor = UIColor.black
        }
        if let userName = userDefault.value(forKey: "kUserName") as? String{
            fullName = userName
        }
        if let addr = userDefault.value(forKey: "kUserAddress") as? String{
            userAddress = addr
        }
        if let tempFontName = userDefault.value(forKey: "kFontFamily") as? String{
            fontName = tempFontName
        }
        if let tempFontSize = userDefault.value(forKey: "kFontSize") as? CGFloat{
            fontSize = tempFontSize
        }
        self.setupUI()
    }
IV) Setup view based on setting Configuration
@IBOutlet weak var lblUserNameTitle: UILabel!
    @IBOutlet weak var lblUserNameValue: UILabel!

    @IBOutlet weak var lblAddressTitle: UILabel!
    @IBOutlet weak var lblAddressValue: UILabel!

    @objc func setupUI(){

        self.view.backgroundColor = backGroundColor

        lblUserNameTitle.textColor = fontColor
        lblUserNameValue.textColor = fontColor
        lblAddressTitle.textColor = fontColor
        lblAddressValue.textColor = fontColor

        lblUserNameValue.text = fullName
        lblAddressValue.text = userAddress

        lblUserNameTitle.font = UIFont(name: fontName, size: fontSize)
        lblUserNameValue.font = UIFont(name: fontName, size: fontSize)
        lblAddressTitle.font = UIFont(name: fontName, size: fontSize)
        lblAddressValue.font = UIFont(name: fontName, size: fontSize)
    }
As a result after completing all this code and configuration project is able to change setting from setting page and you can see it’s value and effect in your app’s view. You can also download the complete demo from GitHub.