There is functionality to simulate location change in iOS simulator & devices but there are limited options which are provided by Apple in the simulator. And in the iOS device need to drive manually for simulation. Now a days there are many applications need simulation in a specific location, Xcode provides facility to use a GPX file for location simulation from one place to another place.
Here is step by step guide to create perfect GPX file from one location to another location.
1) Open Google Maps in any browser.
https://www.google.co.in/maps
2) Enter first place(Starting position of simulation), e.g. Atlanta, Georgia, USA
3) Click on directions button and enter second place (Ending position of simulation). e.g Sandy Springs, Georgia, USA.
Now we get the direction between Atlanta, Georgia, USA to Sandy Springs, Georgia, USA. We can choose any route from multiple available routes like displayed in screenshot.
directiongooglemap-jnb3f0.png)
4) Copy the URL of Google Maps. Here is sample url of Atlanta, Georgia, USA to Sandy Springs, Georgia, USA. Sample URL
5) Open following website for creating GPX file. Click Here.
6) Bellow is screen shot for create the GPX file.
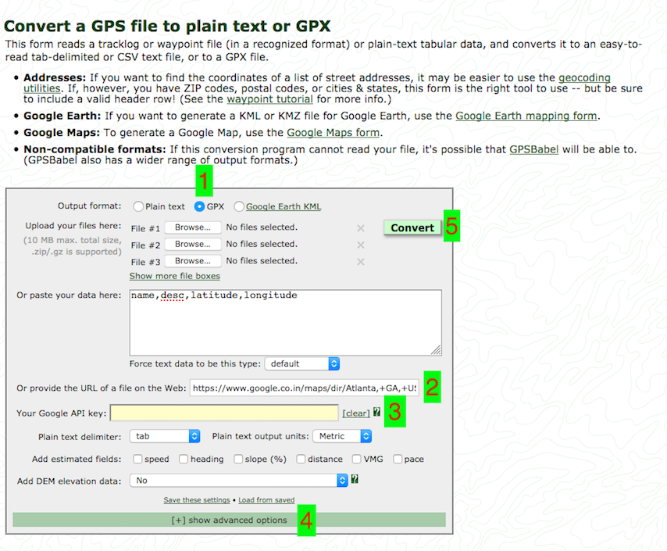
In above screenshot point
1) Select GPX option.
2) Paste the URL of Google Maps direction.
3) Add your Google API key (Make sure your Google API key is enabled for Direction API).
4) There are many advance options for GPX file.
5) After performing all the options press the convert button.
7) Download GPX file and we need to modify GPX file for perfect location simulation.Open downloaded GPX file, there will be many information and all navigation location with direction. >First we need to modify GPX tag in GPX file, we will use this file in Xcode so need to change creator like :-
<gpx version="1.1" creator="GPS Visualizer http://www.gpsvisualizer.com/" xmlns="http://www.topografix.com/GPX/1/1" xmlns:xsi="http://www.w3.org/2001/XMLSchema-instance" xsi:schemaLocation="http://www.topografix.com/GPX/1/1 http://www.topografix.com/GPX/1/1/gpx.xsd">
Replace With
<gpx version="1.1" creator="Xcode">
Xcode only work with WPT tag. Now you will see that there are only 2 WPT tags in GPX file. So, if I keep it as it is then simulation won’t work perfectly. So, we need to replace all tags. click here to get sample perfect GPX file.
Using GPX File
Now we have perfect file of GPX. So we are going to use that file. Create the sample Xcode project and follow the below steps :-
1) Create Xcode project GPXUse.
2) After creating Xcode project we need to get location permission. Here is sample code of getting location permission and update current location of the device in AppDelegate :-
func application(_ application: UIApplication, didFinishLaunchingWithOptions launchOptions: [UIApplicationLaunchOptionsKey: Any]?) -> Bool {
            locationManager.delegate = self
            locationManager.desiredAccuracy = kCLLocationAccuracyBest

            if CLLocationManager.locationServicesEnabled()
            {
                switch(CLLocationManager.authorizationStatus())
                {
                case .authorizedAlways, .authorizedWhenInUse:
                    locationManager.startUpdatingLocation()
                    break
                case .notDetermined:
                    locationManager.requestWhenInUseAuthorization()
                    break
                case .restricted:
                    print("Restricted.")
                    break
                case .denied:
                    UIApplication.shared.open(URL(string:UIApplicationOpenSettingsURLString)!, options: [:], completionHandler: nil)
                }
            }
            return true
        }
func locationManager(_ manager: CLLocationManager, didChangeAuthorization status: CLAuthorizationStatus)
    {
        if status == .authorizedWhenInUse
        {
            locationManager.startUpdatingLocation()
        }
    }
func locationManager(_ manager: CLLocationManager, didUpdateLocations locations: [CLLocation])
    {
        print("User current location===>>",locations)
    }
Add Permission
After you add above code in AppDelegate file, you need to add permission key in info.plist file. Here are 2 lines which you need to add in info.plist file of your project :-
key.Privacy – Location When In Use Usage Description
Privacy – Location Always and When In Use Usage Description
3) Need to add the GPX file in project. Refer below screenshot :-
addgpxfile-kzxuza.png)
Above screenshot.
1) Open finder project and paste the GPX file in route directory.
2) Add that file in your project.
4) Start the simulation through GPX data. Refer below screenshot.
startsimulation-op4sbr.png)
In above Screenshot :-
1) Your file name is displayed. Now click on that file name to start simulation.
Now we got the log in Xcode with change location from GPX one by one.
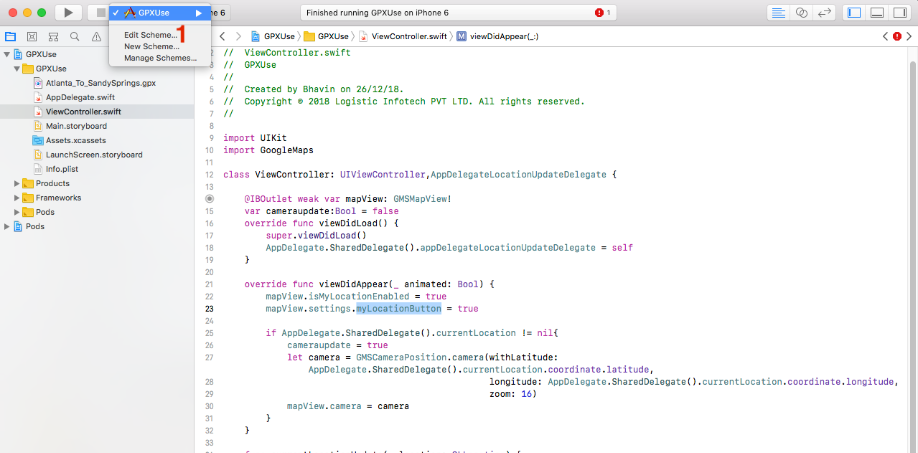
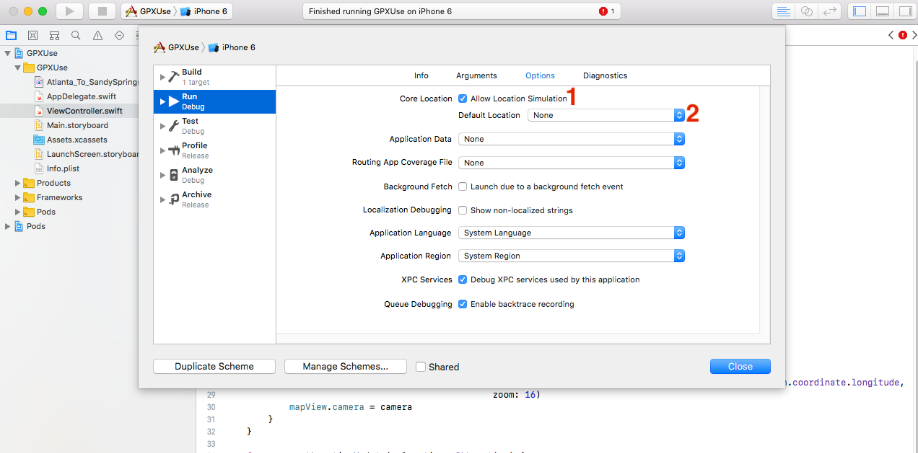
-Additionally we can start simulation when application is start. Set in the setting scheme. Chose Edit Scheme option and refer the below both screenshots.
5) Now integrate Google Maps in project so we need to refer the Google Maps SDK. Follow the below link for add Google Maps in iOS project. Click Here
After installing the Google Maps POD, open the GPXUse.xcworkspace project. Integrate the Google Maps in project. Make sure enable Google Maps API And location button.
Here is sample code of GPX file, download it from GitHub.