A Voice over Internet Protocol (VoIP) is used to make and receive phone calls using an Internet connection instead of the device’s cellular service.
Prior to iOS 8, VoIP apps needed to maintain a persistent connection with server to receive calls using Internet connection. Keeping a connection open in the background, drains the battery as well as causes all kinds of problems when the app crashes or is terminated by the user.
With iOS 8 Apple introduced PushKit. PushKit improves battery life, performance and stability of messaging apps. PushKit is meant to solve these problems by offering a high-priority push notification with a large payload. The VoIP app receives the notification in the background, sets up the connection or process data and displays a local notification to the user. When the user swipes the notification, the call/data is ready to connect/display.
PushKit vs UserNotifications
With VOIP notification user is not presented with badges, alerts or sounds. But if you want to display alert then you can schedule local notification when app receives VoIP notification. In addition, you will get device token without approval of your VoIP app.
Therefore VoIP notifications are totally different than APNS. Both have different kind of set up requirements. With VoIP push notifications instead of using application.registerForRemoteNotifications() and handling the received notifications in application:didReceiveRemoteNotification, you need to use PushKit and the PKPushRegistryDelegate to request a device token and handle the delegate methods.
Prepare to Receive VoIP Push Notifications
First create a VoIP Push Certificate as you see below. However push certificate can be re-used for development and production both.
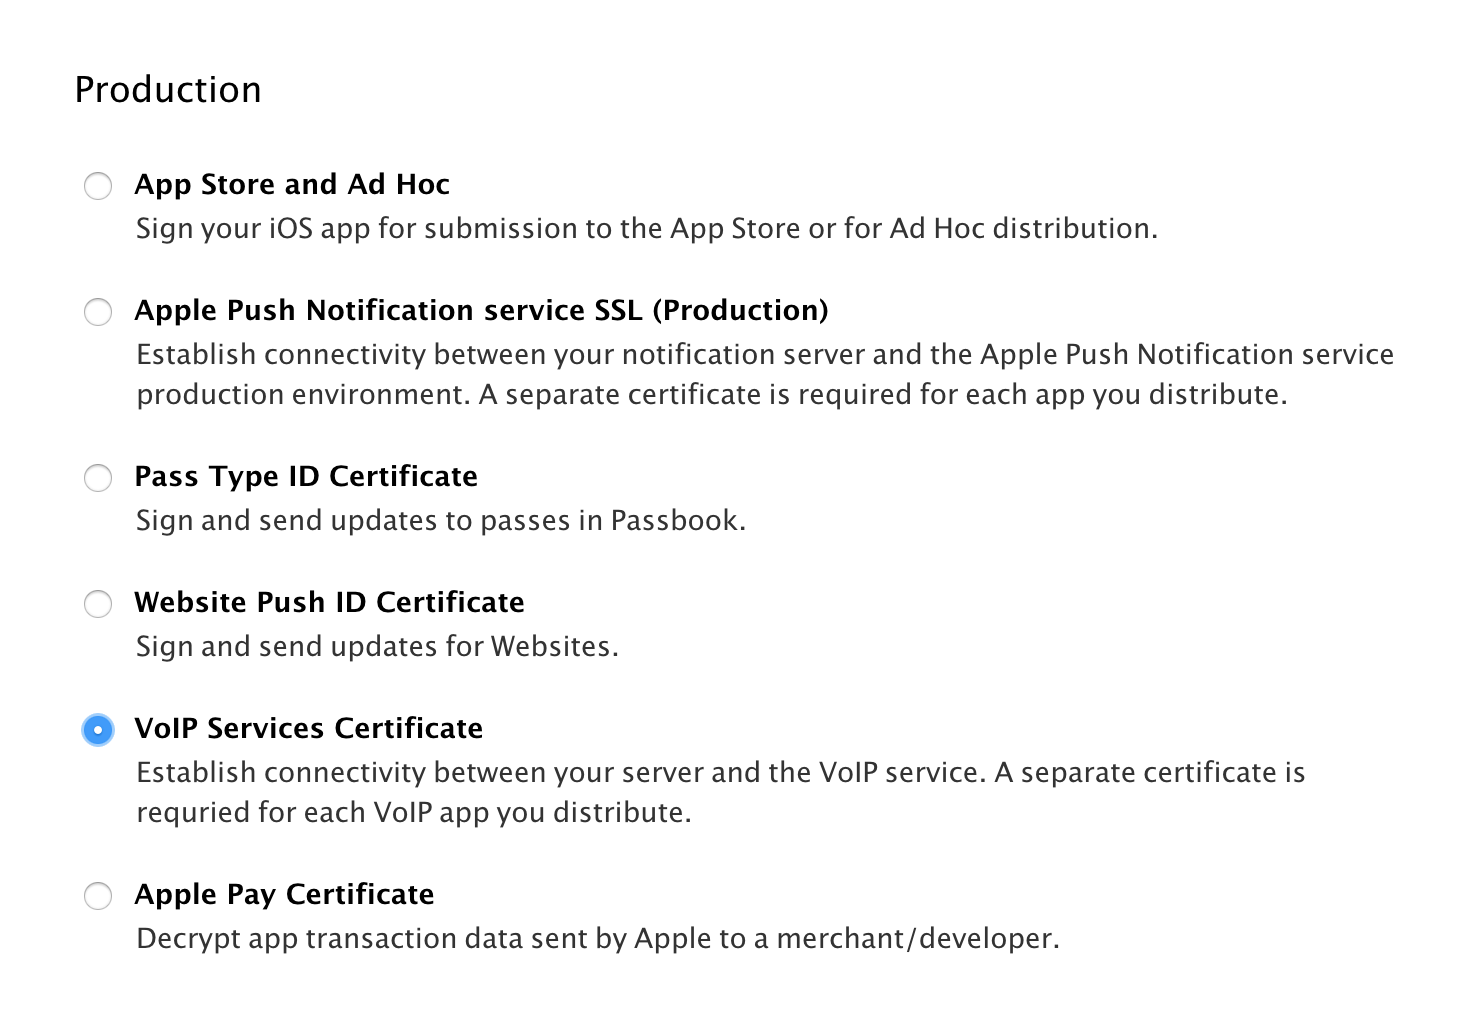
After that,Import the VoIP Push Certificate into Keychain Access and export as a .p12 file.
Create an iOS app and upload the VoIP push certificate for both Production and Development environments.
Enable push notification.

Make sure you have the correct Background Modes in Xcode.
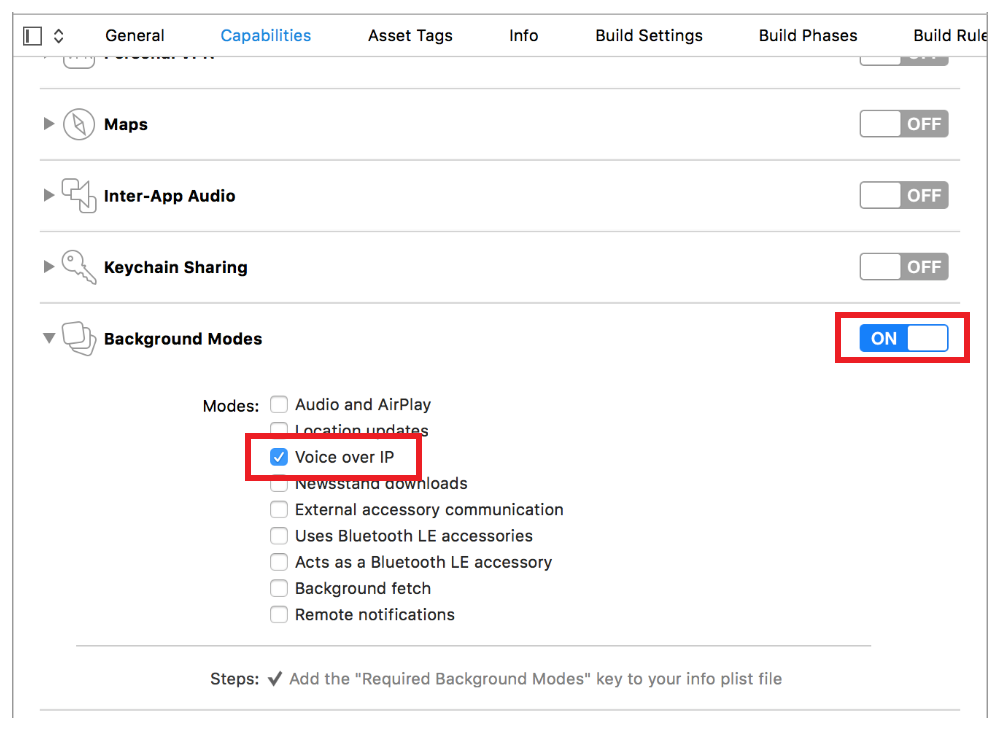
If you are not able to find Voice over IP in option in Background Modes then please add manually in info.plist like
<key>UIBackgroundModes</key>
<array>
	<string>voip</string>
 </array>
Configure VoIP Push Notifications
To configure your app to receive VoIP push notifications, link to the PushKit framework in your app delegate (or some other location in your app). Then, create a PKPushRegistry object, set its delegate to self, and register to receive VoIP pushes. In this demo I have also enable standard push notification.
UNUserNotificationCenter.current().delegate = self
if #available(iOS 10, *) {
   UNUserNotificationCenter.current().requestAuthorization(options:[.badge, .alert, .sound]){ granted, error in }
} else {
   application.registerUserNotificationSettings(UIUserNotificationSettings(types: [.badge, .sound, .alert], categories: nil))
}
application.registerForRemoteNotifications()

let voipRegistry = PKPushRegistry(queue: DispatchQueue.main)
voipRegistry.desiredPushTypes = Set([PKPushType.voIP])
voipRegistry.delegate = self;
func application(_ application: UIApplication, didRegisterForRemoteNotificationsWithDeviceToken deviceToken: Data) {
    let deviceTokenString = deviceToken.reduce("") { $0 + String(format: "%02X", $1) }
    print("APNs device token: \(deviceTokenString)")
}
extension AppDelegate: UNUserNotificationCenterDelegate {
    //MARK: - UNUserNotificationCenterDelegate methods
    func userNotificationCenter(_ center: UNUserNotificationCenter, didReceive response: UNNotificationResponse, withCompletionHandler completionHandler: @escaping () -> Void) {
        completionHandler()
    }
    func userNotificationCenter(_ center: UNUserNotificationCenter, willPresent notification: UNNotification, withCompletionHandler completionHandler: @escaping (UNNotificationPresentationOptions) -> Void) {
        completionHandler([.alert, .sound, .badge])
    }
}
Implement PKPushRegistryDelegate method to handle PKPushCredentials and it will contains VOIP token. This token is completely different from standard push notification token.
func pushRegistry(_ registry: PKPushRegistry, didUpdate pushCredentials: PKPushCredentials, for type: PKPushType) {
        NSLog("VoIP Token: \(pushCredentials)")
        let deviceTokenString = pushCredentials.token.reduce("") { $0 + String(format: "%02X", $1) }
        print(deviceTokenString)
}
Finally implement another delegate method to process received push. When you received notification and your application is not running then it will be launched automatically in background and process data received in push accordingly.
func pushRegistry(_ registry: PKPushRegistry, didUpdate pushCredentials: PKPushCredentials, for type: PKPushType) {
        //print out the VoIP token. We will use this to test the nofications.
        NSLog("VoIP Token: \(pushCredentials)")
        let deviceTokenString = pushCredentials.token.reduce("") { $0 + String(format: "%02X", $1) }
        print(deviceTokenString)
    }
@available(iOS, introduced: 8.0, deprecated: 11.0)
func pushRegistry(_ registry: PKPushRegistry, didReceiveIncomingPushWith payload: PKPushPayload, for type: PKPushType) {
    self.handlePushPayload(payload)
}
@available(iOS 11.0, *)
func pushRegistry(_ registry: PKPushRegistry, didReceiveIncomingPushWith payload: PKPushPayload, for type: PKPushType, completion: @escaping () -> Void) {
    self.handlePushPayload(payload)
    completion()
}
func pushRegistry(_ registry: PKPushRegistry, didInvalidatePushTokenFor type: PKPushType) {
    NSLog("Token Invalidate")
}
func handlePushPayload(_ payload: PKPushPayload) {
    let objNotification = CoreDataManager.sharedInstance.createObjectForEntity(entityName: CoreDataEntity.kEntity_Notifications) as! Notifications
    objNotification.createdTime = Date() as NSDate
    objNotification.payload = payload.dictionaryPayload as NSObject
    CoreDataManager.sharedInstance.saveContext()

    NotificationCenter.default.post(name: .reloadNotification, object: nil)

    let payloadDict = payload.dictionaryPayload["aps"] as! Dictionary<String, Any>
    let message = payloadDict["alert"] as! String
    //present a local notifcation to visually see when we are recieving a VoIP Notification
    if UIApplication.shared.applicationState == UIApplicationState.active {
        DispatchQueue.main.async() {
           let alert = UIAlertController(title: "VoIP Demo", message: message, preferredStyle: .alert)
           alert.addAction(UIAlertAction(title: "OK", style: .default, handler: nil))
           UIApplication.shared.keyWindow?.rootViewController?.present(alert, animated: true, completion: nil)
        }
     } else {
        let content = UNMutableNotificationContent()
        content.title = "VoIPDemo"
        content.body = message
        content.badge = 0
        content.sound = UNNotificationSound.default()

        let trigger = UNTimeIntervalNotificationTrigger(timeInterval: 1, repeats: false)
        let request = UNNotificationRequest(identifier: "VoIPDemoIdentifier", content: content, trigger: trigger)
        UNUserNotificationCenter.current().add(request, withCompletionHandler: nil)
     }

     NSLog("Arrived VoIP Notification: \(payload.dictionaryPayload)")
}
This handlePushPayload method will handle received notification as per application state. If application is active then app will provide simple alert while in other cases app will trigger local notification. This is only for testing purpose only because user can not be notify directly from VOIP notification.
I am storing notification in core data to display all arrived notification list in home screen of the app.
Test Push Notification Online with this simple tool here.