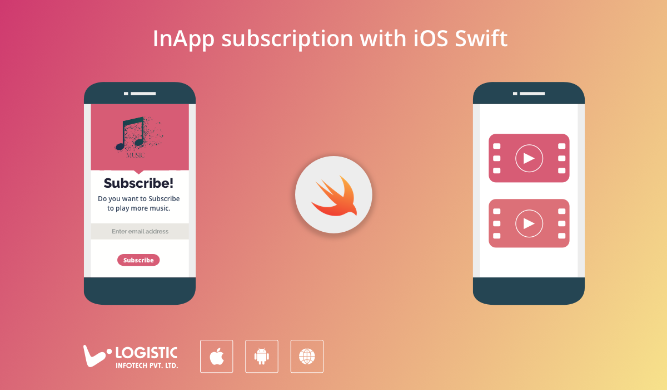
InApp subscription is now essential for the product offering digital contents or services on regular basis to their customers within the app. Recently there are major changes in the auto-renewable subscription. Initially, it was limited for Newsstand app and limited category of apps where it was essential. At the end of subscription duration, it will get auto-renew until end-user cancels it.
There are two kind of subscriptions provided by Apple
1. Non-renewing Subscriptions: A product that allows users to purchase a service with a limited duration. The content of this in-app purchase can be static. This type of subscription does not renew automatically. e.g One-year subscription to a catalog of archived articles.
2. Auto-renewable Subscriptions: A product that allows users to purchase dynamic content for a set period. This type of subscription renews automatically unless canceled by the user. e.g. Monthly subscription for an app offering a streaming service.
First of all, here I am presuming that you are already aware of Consumable and Non-Consumable InApp purchase, so in this article, you will learn about Subscription. Hence you will learn how to create subscription id, implementation in code and at last, you will learn how to check your subscription status using a receipt.
Let’s start with an auto-renewable subscription, here you need to create subscription product id on App Store and then after need to use that product id from application side to purchase and validate with Apple server.
Getting started
Here I have created a simple app on the App Store. I will create subscriptions for weekly, monthly, quarterly and yearly based subscriptions. Let’s set detail for each subscription with the price. e.g.
$0.99/week
$1.99/month
$4.99/quarter
$9.99/year
Once we have list of all products we will purchase them one by one on app side.
Before we begin to create subscription you may need to know how you will able to test In-App subscription. For that Apple provide great way to test these subscriptions using sandbox users for development purpose. During sandbox mode subscription gets expire after defined time from purchase time. Here you will find detail about it.
Actually Subscription time : Sandbox subscription time
1 week : 3 minutes
1 month : 5 minutes
3 month : 15 minutes
1 year : 1 hour
Creating Auto Renewable InApp Subscription products.
To achieve this you need Apple Developer account. Let’s sign in with your developer account credential and select My Apps from the dashboard. Either you can create a new app or select your existing app and fill required detail for that.
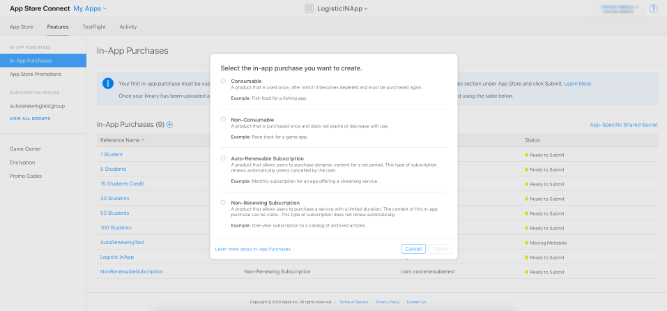
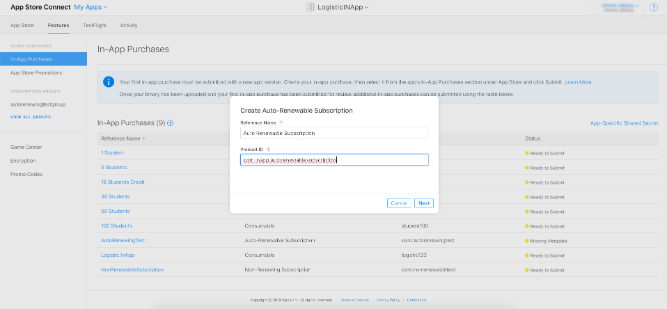
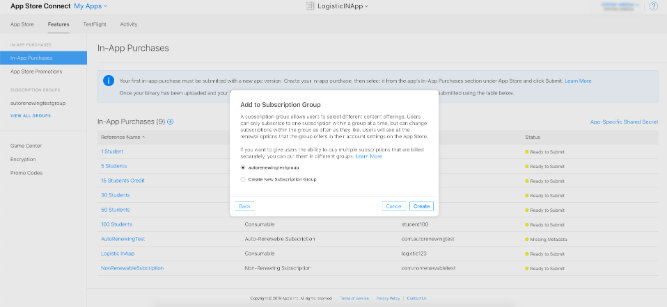
Now to create subscriptions click on Features tab and select “In-App Purchase” from the left panel as shown in below screenshot. Now Click on + icon and select “Auto Renewable Subscription”.Now let’s add product detail as we have planned above. Below you will see screenshots which demonstrate how to create subscription product id.
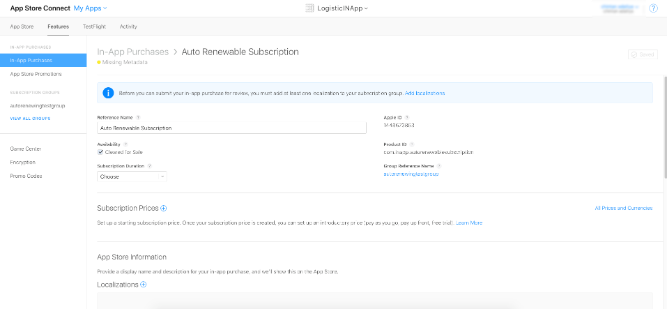
You need to fill following detail to create subscription product id.
Reference Name : Weekly Subscription
Product ID : com.inapp.autorenewablesubscription (you need this product id unique)Subscription Group Reference Name : Auto Renewable Subscriptions
Cleared for Sale: Check the box
Duration: 1 Week Free
Trial: None
Starting Price: $1.99 (Note : accept the auto-selected values for all territories)
Localizations: Add English (U.S.)Subscription Display Name: Auto Renewable Subscription (Weekly)Description: add your subscription detail
Repeat above steps for all the subscription products which you want to create.
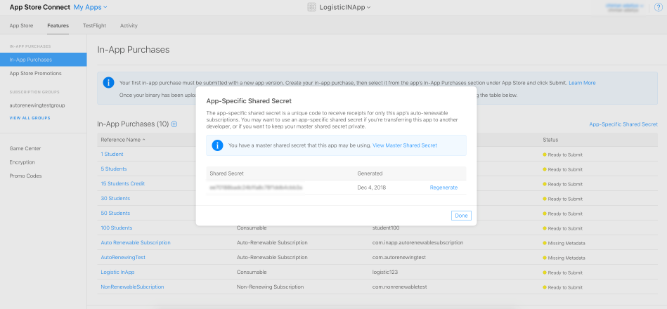
Getting Shared Secret
Security is important therefore, Apple provides the best way to verify receipt to confirm the status of your purchased products. To accomplish this you may need Shared Secret from your Apple account. Let’s follow this path to get Shared Secret: Select your application > Feature > App-Specific Shared Secret. Click on App-Specific Shared Secret and copy it so you can use it. You can see in below screenshot.
Finally, you are done with subscription product id creation and you have a list of your products and Shared Secret. Let’s move now to the next section to implement in-app purchase using StoreKit within your application.
Implement StoreKit in your iOS app
Using the StoreKit framework you will be able to purchase InApp products. I am presuming that you are already aware of StoreKit. Let’s create new iOS application and import StoreKit to it as shown in the following code.
import StoreKit
The first step is to fetch a subscription product list from the App Store. You can accomplish this using SKProductsRequest. Below you will find code snippets for product fetch request and their delegate methods.
Once SKProductsRequest gets called successfully, you will receive a response in productsRequest(_:didReceive:) method. Which will provide you SKProduct array created by you.
func fetchAvailableProducts(){
        // Put here your IAP Products ID's

        let productIdentifiers = NSSet(objects:"Your product ids")
        productsRequest = SKProductsRequest(productIdentifiers: productIdentifiers as! Set<String>)
        productsRequest.delegate = self
        productsRequest.start()
}
func productsRequest(_ request: SKProductsRequest, didReceive response: SKProductsResponse) {
        if (response.products.count > 0) {
            iapProducts = response.products
            self.arr.removeAllObjects()
            for prod in response.products
            {
                arr.add(prod)
            }
            tblData.reloadData() //reload your table view to list products.
        }
    }
Buying a product
Finally, you have a list of your products. Next, you need to write a code to buy the product. To accomplish this you may need to provide options for Payment Queue and permission to make a purchase using the current device you have. It will Return true if the device is able to make payments or return false. Finally, you have a list of products and also permission for payment. Now let’s buy the product, you will see that in below code.
func buyProduct(_ product: SKProduct)
    {
        // Add the StoreKit Payment Queue for ServerSide
        SKPaymentQueue.default().add(self)
        if SKPaymentQueue.canMakePayments()
        {
            print("Sending the Payment Request to Apple")
            let payment = SKPayment(product: product)
            SKPaymentQueue.default().add(payment)
            productID = product.productIdentifier
        }
        else
        {
            print("cant purchase")
        }
    }
If anything goes wrong during purchase then this delegate method will be called.
  func request(_ request: SKRequest, didFailWithError error: Error)
    {
        print(request)
        print(error)
    }
Finally, if there isn’t any error than below delegate method will be called. In response, you will get the detail of the transaction done by a user with a receipt of that transaction.
    func paymentQueue(_ queue: SKPaymentQueue, updatedTransactions transactions: [SKPaymentTransaction]) {
        for transaction:AnyObject in transactions {
            if let trans = transaction as? SKPaymentTransaction {
                switch trans.transactionState {

                case .purchased:
                    SKPaymentQueue.default().finishTransaction(transaction as! SKPaymentTransaction)
                    print("Success")
                    UserDefaults.standard.setValue(productID, forKey: "currentSubscription")
                    self.tblData.reloadData()
                    self.receiptValidation()
                    break
                case .failed:
                    SKPaymentQueue.default().finishTransaction(transaction as! SKPaymentTransaction)
                    print("Fail")

                    break
                case .restored:
                    print("restored")
                    SKPaymentQueue.default().restoreCompletedTransactions()
                    break
                default:
                    break
                }
            }

        }
    }
let receiptFileURL = Bundle.main.appStoreReceiptURL
let receiptData = try? Data(contentsOf: receiptFileURL!)
let recieptString = receiptData?.base64EncodedString(options: NSData.Base64EncodingOptions(rawValue: 0))
Below you will find the code for receipt verification for that you will need receipt string and Shared Secret. You may also need to specify your environment for verification and need to set up store URL. In this article, we are using Sandbox URL for receipt verification. Below you will find both URL and receipt validation function.
SandBox: “https://sandbox.itunes.apple.com/verifyReceipt”

iTunes Store : “https://buy.itunes.apple.com/verifyReceipt”
func receiptValidation() {

        let receiptFileURL = Bundle.main.appStoreReceiptURL
        let receiptData = try? Data(contentsOf: receiptFileURL!)
        let recieptString = receiptData?.base64EncodedString(options: NSData.Base64EncodingOptions(rawValue: 0))
        let jsonDict: [String: AnyObject] = ["receipt-data" : recieptString! as AnyObject, "password" : "ee70188badc24b1fa8c78f1ddb4cbb3a" as AnyObject]

        do {
            let requestData = try JSONSerialization.data(withJSONObject: jsonDict, options: JSONSerialization.WritingOptions.prettyPrinted)
            let storeURL = URL(string: verifyReceiptURL)!
            var storeRequest = URLRequest(url: storeURL)
            storeRequest.httpMethod = "POST"
            storeRequest.httpBody = requestData

            let session = URLSession(configuration: URLSessionConfiguration.default)
            let task = session.dataTask(with: storeRequest, completionHandler: { [weak self] (data, response, error) in

                do {
                    let jsonResponse = try JSONSerialization.jsonObject(with: data!, options: JSONSerialization.ReadingOptions.mutableContainers)
                    print("=======>",jsonResponse)
                    if let date = self?.getExpirationDateFromResponse(jsonResponse as! NSDictionary) {
                        print(date)
                    }
                } catch let parseError {
                    print(parseError)
                }
            })
            task.resume()
        } catch let parseError {
            print(parseError)
        }
    }
Getting expiry date of subscription
Once validation is done, below method will return expiry date of your subscription. As a result, you will receive receipt JSON as below.
func getExpirationDateFromResponse(_ jsonResponse: NSDictionary) -> Date? {

        if let receiptInfo: NSArray = jsonResponse["latest_receipt_info"] as? NSArray {

            let lastReceipt = receiptInfo.lastObject as! NSDictionary
            let formatter = DateFormatter()
            formatter.dateFormat = "yyyy-MM-dd HH:mm:ss VV"

            if let expiresDate = lastReceipt["expires_date"] as? String {
                return formatter.date(from: expiresDate)
            }

            return nil
        }
        else {
            return nil
        }
    }
{
    “expires_date_ms” = 1544016122000;
    “expires_date_pst” = “2018-12-05 05:22:02 America/Los_Angeles”;
    “expires_date” = “2018-12-05 13:22:02 Etc/GMT”;
    “is_in_intro_offer_period” = false;
    “is_trial_period” = false;
    “original_purchase_date” = “2018-12-04 12:35:58 Etc/GMT”;
    “original_purchase_date_ms” = 1543926958000;
    “original_purchase_date_pst” = “2018-12-04 04:35:58 America/Los_Angeles”;
    “original_transaction_id” = 1000000482063742;
    “product_id” = “com.autorenewingtest”;
    “purchase_date” = “2018-12-05 13:17:02 Etc/GMT”;
    “purchase_date_ms” = 1544015822000;
    “purchase_date_pst” = “2018-12-05 05:17:02 America/Los_Angeles”;
    quantity = 1;
    “transaction_id” = 1000000482756519;
    “web_order_line_item_id” = 1000000041646091;
}
That’s it. If you have any questions or issues regarding implementation of in-app purchase in your application then feel free to contact us or comment below. Here is GitHub link to grab above source code easily.