Learn Android MVP Basics and Create Sample App
This article is for beginners who wants to use Android MVP. So we have created a small sample app that will help you to create your first app using MVP structure.
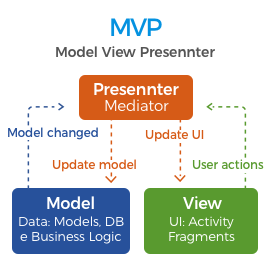
Why do we need MVP or any structure?
While working with any long-term project, it needs to be scalable, less complicated. MVP makes it possible by dividing code structure into three different layers (MODEL – PRESENTER – VIEW).
Let’s Understand how this will work:
Model
Model manage data components that provide functionality like fetch, store, sort, and expose data.
View
View manage user interface actions.
Presenter
Presenter works as an intermediator between View and Model. Presenter accept event from View, analyse action, get required data from Model and send data back to View for update UI.
Lets visually represent how it looks:
Let’s create small App for Simple Notes
Here we are going to make simple daily notes application with login functionality.
You can see how code structure will look like in below image. We distribute code into three packages,
-
Data (As MODEL)
-
Presenter (As PRESENTER)
-
View(As VIEW)

Every screen contains at least one Activity class, one ActivityView class and one ActivityPresenter class, data classes are independent of a screen because it directly communicates with Presenter classes.
Here we are providing you login screen details with example.
Let’s create Login screen.
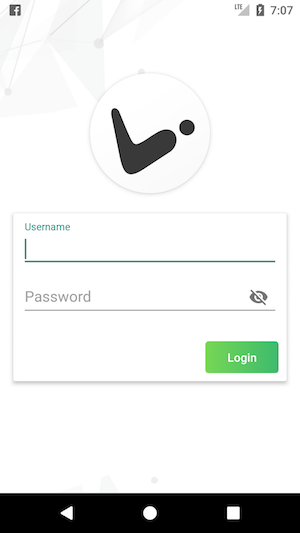
1. Create LoginActivity.javaand activity_login.xml file in your project, its simple right?
2. Now we will create view class LoginActivityView.java – this is interface class. In this class, we create abstract methods which will be used when presenter needs to send a callback to Activity(like update UI data).
3. Now create presenter class LoginPresenter.java – this class act as mediator.
4. We use SharedPreferences as local storage for handle user login status and save notes.
We will create PreferencesProvider.java class – which used for creating an instance of SharedPreferences and provide this instance in the whole app.
public class PreferencesProvider{

private static String SHARED_PREFERENCES = "mvpPreferences";

private static SharedPreferences sPreferences;

public static SharedPreferences providePreferences() {
       return sPreferences;
   }
 public static void init(Context context) {
       sPreferences = context.getSharedPreferences(SHARED_PREFERENCES, Context.MODE_PRIVATE);
   }
}
Create App.java as Application class – here we initialize an instance of PreferencesProvider.
public class App extends Application {
   @Override
   public void onCreate() {
       super.onCreate();
       PreferencesProvider.init(this);
   }
}
Now, we will create two classes to handle data, first UserPreferences.java as an interface that contains abstract method and second UserPreferencesImpl.java which implement UserPreferences interface.
public interface UserPreferences {
   String IS_USER_LOGIN = "isUserLogin";
   public void setUserLogin(boolean status);
   public boolean isUserLogin();
   public void clearUser();
   void removeNote(Note note);
}
import android.content.SharedPreferences;
import android.text.TextUtils;
import mvpdemo.rajnit.com.mvpblogdemo.data.models.Note;

public class UserPreferencesImpl implements UserPreferences {
   protected SharedPreferences mPreferences;
   public UserPreferencesImpl() {
       this.mPreferences = PreferencesProvider.providePreferences();
   }
   @Override
   public boolean isUserLogin() {
       return mPreferences.getBoolean(IS_USER_LOGIN, false);
   }
   @Override
   public void setUserLogin(boolean status) {
       mPreferences.edit().putBoolean(IS_USER_LOGIN, status).apply();
   }
   @Override
   public void clearUser() {
       mPreferences.edit()
               .putBoolean(IS_USER_LOGIN, false)
               .apply();
   }
}
Now we will create login screen activity.
import android.content.Intent;
import android.os.Bundle;
import android.view.View;
import android.widget.Button;
import android.widget.EditText;
import mvpdemo.rajnit.com.mvpblogdemo.R;
import mvpdemo.rajnit.com.mvpblogdemo.presenter.LoginPresenter;
import mvpdemo.rajnit.com.mvpblogdemo.presenter.Presenter;
import mvpdemo.rajnit.com.mvpblogdemo.view.activities.views.LoginActivityView;

public class LoginActivity extends AbstractActivity implements LoginActivityView {
   private EditText edtUserName, edtPassword;
   private Button btnLogin;

   private LoginPresenter mPresenter = new LoginPresenter(this);

   @Override
   protected void onCreate(Bundle savedInstanceState) {
       super.onCreate(savedInstanceState);
       setContentView(R.layout.activity_login);
       edtUserName = findViewById(R.id.edtUserName);
       edtPassword = findViewById(R.id.edtPassword);
       btnLogin = findViewById(R.id.btnLogin);
       initListeners();
       mPresenter.onCreate(getIntent());
   }

   private void initListeners() {
       btnLogin.setOnClickListener(new View.OnClickListener() {
           @Override
           public void onClick(View v) {
               mPresenter.login(edtUserName.getText().toString(), edtPassword.getText().toString());
           }
       });
   }

   @Override
   Presenter getPresenter() {
       return mPresenter;
   }

   @Override
   public void showMainActivity() {
       startActivity(new Intent(LoginActivity.this,MainActivity.class));
       overridePendingTransition(R.anim.fade_in,R.anim.fade_out);
       finish();
   }

   @Override
   public void showError(String errorMsg) {
       showToast(errorMsg);
   }

}
Now we will create LoginActivityView interface (As View).
public interface LoginActivityView {
   void showMainActivity();
   void showError(String errorMsg);
}

⇒ Now create LoginPresenter class (As Presenter).
LoginPresenter.java
public class LoginPresenter extends AbstractPresenter {
   private LoginActivityView mView;
   UserPreferences mDatabase = new UserPreferencesImpl();

   public LoginPresenter(LoginActivityView mView) {
       this.mView = mView;
   }

   public void onCreate(Intent intent) {
       // Handle intent data here...
   }

   public void login(String username, String password) {
       if(TextUtils.isEmpty(username)){
           mView.showError("Please enter username");
       }else if(username.length() < 6){
           mView.showError("Username must contains 6 letters");
       }else if(TextUtils.isEmpty(password)){
           mView.showError("Please enter password");
       }else if(password.length() < 6){
           mView.showError("Password must contains 6 letters");
       }else {
           mDatabase.setUserLogin(true);
           mView.showMainActivity();
       }
   }
}
Let’s check how code flow works:
-
- LoginActivity implements LoginActivityView interface and @override its methods.
public class LoginActivity extends AbstractActivity implements LoginActivityView
-
- We initialize LoginPresenter in LoginActivity and pass LoginActivityView reference in constructor.
private LoginPresenter mPresenter = new LoginPresenter(this);
-
- When you click on login button it triggers login click event and calls presenter login method.
btnLogin.setOnClickListener(new View.OnClickListener() {
           @Override
           public void onClick(View v) {
               mPresenter.login(edtUserName.getText().toString(), edtPassword.getText().toString());
           }
       });
-
- Login method in presenter will check if username and password are valid or not.
public void login(String username, String password) {
   if(TextUtils.isEmpty(username)){
       mView.showError("Please enter username");
   }else if(username.length() < 6){
       mView.showError("Username must contains 6 letters");
   }else if(TextUtils.isEmpty(password)){
       mView.showError("Please enter password");
   }else if(password.length() < 6){
       mView.showError("Password must contains 6 letters");
   }else {
       mDatabase.setUserLogin(true);
       mView.showMainActivity();
   }
}
-
- If username or password is incorrect then trigger showError() method and it gives callback in LoginActivity.
public void showError(String errorMsg) {
  if (errorMsg == null || errorMsg.isEmpty()) return;
  Toast.makeText(this, errorMsg, Toast.LENGTH_LONG).show();
}
-
- If username and password is correct then it will update status in local storage.
mDatabase.setUserLogin(true);
mView.showMainActivity();
-
- Below method is to get callback in loginActivity.
public void showMainActivity() {
   startActivity(new Intent(LoginActivity.this,MainActivity.class));
   overridePendingTransition(R.anim.fade_in,R.anim.fade_out);
   finish();
}
That’s it. We have created the login screen using MVP structure.
You can check out our Github Repo for full app development.
If you have any query, feel free to comment.