This is the second part of React Apollo Client Subscription frontend which uses Golang backend. Please read the Part 1 here if you have not checked yet.
We haven’t use apollo-boost as it will not work with the subscription as that is our aim to accomplish here.
Understanding apollo client is a little tricky at first. So try to follow along and if still not getting add comments for me and I will try to reply.
For this demo preferred path is
~/go/src/golang-gqlgen-reactjs-subscription-demo/reactjs
Step 1: Creating React App
So let’s create react app with
$ npx create-react-app npx create-react-app my-app
First of all we need to connect our front-end with back end.
So we will be using Apollo Client to connect with Golang backend.
This code will go into my-app/src/index.js
I am just adding code parts which need change or added new.
import { ApolloProvider } from 'react-apollo';
import ApolloClient from 'apollo-client';
import {WebSocketLink} from 'apollo-link-ws';

const wsLink = new WebSocketLink({
    uri: environment.WSHost,
    options: {
        reconnect: true,
        connectionParams: {
            Authorization:
                `Bearer ${localStorage.getItem('auth_token')}`
        },
    }
});
const apolloClient = new ApolloClient({
    link: wsLink,
    cache: new InMemoryCache(),
});

function render(component) {
    ReactDOM.render(<apolloprovider client="{apolloClient}">
        {component}
    </apolloprovider>, document.getElementById('root'));
}

render();
Here we can see how apolloprovider has consumed apolloClient and added it in render.
Step 2: Create component for CRUD operation of channel
my-app/src/components/ChannelList.jsx
As it’s going to be little longer, I will try to divide it in smaller parts.
- Required Imports
import { graphql, Mutation, compose } from 'react-apollo';
import gql from 'graphql-tag';
- At the end of file we will declare GraphQL query subscription and mutation as below :-
export const channelsListQuery = gql`
    query ChannelsListQuery {
        channels {
            id
            name
        }
    }
`;

const CreateChannelMutation = gql`
    mutation addChannel($name: String!) {
        addChannel(name: $name) {
            id
            name
        }
    }
`;

const addChannelSubscription = gql`
    subscription Channels {
        subscriptionChannelAdded {
            id
            name
        }
    }
`;

const multipleMutation = compose(
    graphql(CreateChannelMutation, { name: 'createChannelMutation' }),
    graphql(updateChannel, { name: 'updateChannelMutation' })
)

export default compose(multipleMutation, graphql(channelsListQuery))
                                            (ChannelsList);
The best part of apollo client is here, Syntax of GraphQL block declaration is exactly the same as GraphQL.
Nothing is much fancy although for a newcomer it will take little time to get grip on it.
These are the functions which will be exposed to our this.props.
So let’s understand most tricky part here.
Export default compose(multipleMutation, graphql(channelsListQuery))(ChannelsList);
Above line is doing little bit of magic here.
So compose is used to call two function
- multipleMutation => It merges two mutation and exposing it to this.props
- graphql(channelsListQuery) => Its responsible to fetch channel list initially and exposing it to this.props.data.channels.
Main thing we need to understand here is compose call functions from left to right so graphql(channelsListQuery) will be called first.
So here we have fetched channels through GraphQL query. This will not only fetch channel list but also exposing few main property to this.props.data
eg. subscribeToMore this will be useful to subscribe to channelAdded.
Step 3: Using createChannelMutation
So we just need to execute below block to add new Channel. We can use click event or some other event to call it.
this.props.createChannelMutation({
    variables: {
        name: 'MyChannel1'
    },
}).then((data) => {
    console.log("channel added",data);
});
Step 4:
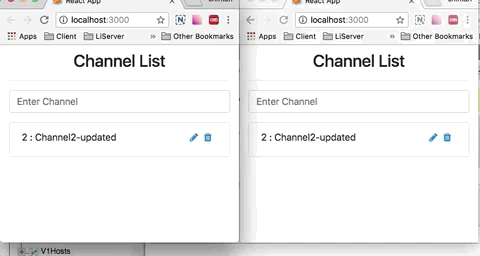
Now let’s see little about how we will render our channels in UI. It’s just so simple looping through channel and rendering li.
<ul className="list-group">
    {channels.map(ch =>
        <li key={"div_" + ch.id} className="list-group-item">
            <label htmlFor="checkbox5">
                {ch.id} : {ch.name}
            </label>
        </li>
    )}
</ul>
So where is the subscription for the channels which we just add, are we going to explore it or not? :angry:
well of-course next block is just showing that 
Step 5: Subscription (React Apollo Client Subscription)
componentWillMount() {
    this.props.data.subscribeToMore({
        document: addChannelSubscription,  // Use the subscription
        updateQuery: (prev, { subscriptionData }) => {
            if (!subscriptionData.data) {
                return prev;
            }
            const newChannel = subscriptionData.data
                               .subscriptionChannelAdded;
            // Add check to prevent double adding of channels.
            if (!prev.channels.find((channel)
                     => channel.id === newChannel.id)) {

                let updatedChannels = Object.assign({}, prev,
                     { channels: [...prev.channels, newChannel] });

                return updatedChannels;
            } else {
                return prev;
            }
        }
    });
}
We will be using subscribeToMore function for addChannelSubscription as above.
So here updateQuery will be called automatically once new channel added and we have new data from socket.
subscribeToMore was expsosed from query result to this.props.data.subscribeToMore
So these are all connected things, I have tried my best to fit it in sequence for better understanding.
Isn’t that looks like magic? Apolo Client has done all the heavy lifting for us.