AWS Amplify is a new tool which enable us to create resources via CLI and provides SDK for iOS, Android and javascript even it has SDK for react-native also. Due to we can easily integrate services like S3 bucket upload, DynamoDB, etc. Here we are going to cover the setup of AWS amplify in our PC and S3 upload in Ionic Project.
Follow these steps for AWS server configuration using Amplify :
Step 1 : Install and configure the Amplify CLI
=> npm install -g @aws-amplify/cli
=> amplify configure
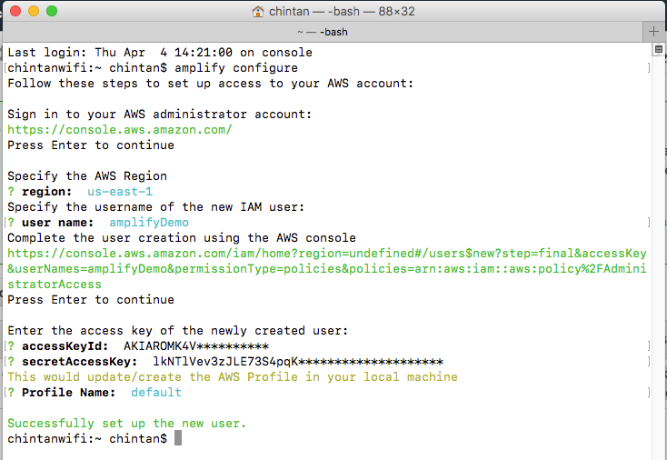
Refer this link for amplifying configuration.
Step 2 : Add it in your project
=> Create Ionic/Angular project or use existing one.
=> Install below dependency.
npm install –save aws-amplify aws-amplify-angular
=> add `(window as any).global = window;` in `polyfill.ts`.
=> The “node” package should be included in types compiler option. update your `src/tsconfig.app.json`:
"compilerOptions": {
    "types" : ["node"]
}
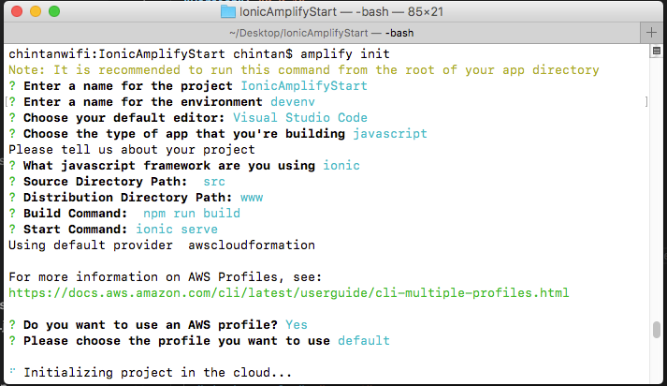
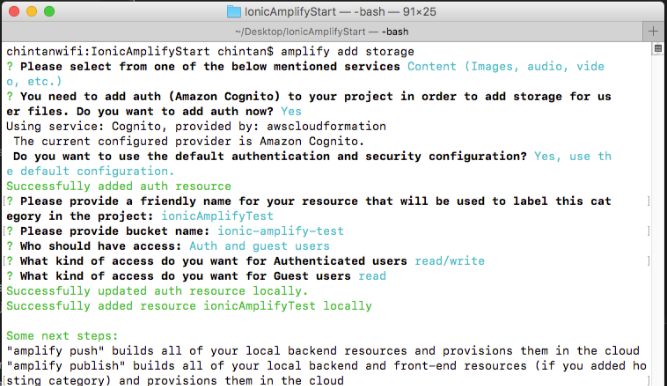
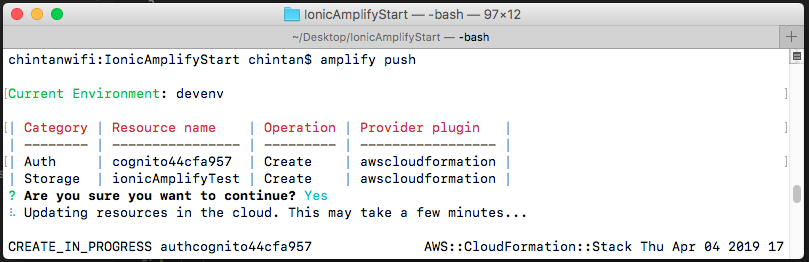
Step 3 : Use Amplify CLI – follow below steps :
=> amplify init
=> amplify add storage
=> amplify push
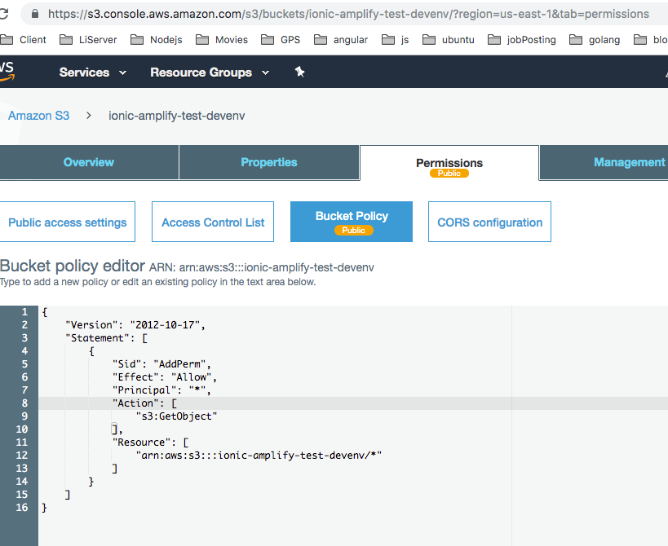
=> Now to grant Read-Only Permission to an Anonymous User, you need to edit your Bucket Policy as below block.
{
    "Version": "2012-10-17",
    "Statement": [
        {
            "Sid": "AddPerm",
            "Effect": "Allow",
            "Principal": "*",
            "Action": [
                "s3:GetObject"
            ],
            "Resource": [
                "arn:aws:s3:::ionic-amplify-test-devenv/*"
            ]
        }
    ]
}
Your policy should look like this image:
Step 4 : Import the configuration file in Project :
After creating your backend a configuration file will be generated in your configured source directory you identified in the `amplify init` command.
Import the configuration file and load it in `main.ts` :
import Amplify from 'aws-amplify';
import amplify from './aws-exports';
Amplify.configure(amplify);
Note :Depending on your TypeScript version you may need to rename the `aws-exports.js` to `aws-export.ts` prior to importing it into your app, or enable the `allowJs` compiler option in your tsconfig.
Manual Setup :
This step is only required if you haven’t followed above steps.
Manual setup enable you to use your existing Amazon Cognito and Amazon S3 credentials in your app:
import Amplify from 'aws-amplify'

Amplify.configure({
    Auth: {
        identityPoolId:'XX-XXXX-X:XXXXXXXX-XXXX-1234-abcd-1234567890ab', //REQUIRED - Amazon Cognito Identity Pool ID
        region: 'XX-XXXX-X', // REQUIRED - Amazon Cognito Region
        userPoolId: 'XX-XXXX-X_abcd1234', //OPTIONAL - Amazon Cognito User Pool ID
        userPoolWebClientId: 'XX-XXXX-X_abcd1234', //OPTIONAL - Amazon Cognito Web Client ID
    },
    Storage: {
        AWSS3: {
            bucket: ' ', //REQUIRED -  Amazon S3 bucket
            region: 'XX-XXXX-X', //OPTIONAL -  Amazon service region
        }
    }
});
Step 5 : Importing the Angular Module
import { AmplifyAngularModule, AmplifyService } from 'aws-amplify-angular';
@NgModule({
  ...
  imports: [
    ...
     AmplifyAngularModule
  ],
  ...
  providers: [
    ...
     AmplifyService
  ]
  ...
});
Add the following to your `styles.css/global.scss` file to use the default styles:
@import '~aws-amplify-angular/Theme.css';
Upload, Download and Remove images from AWS using Amplify methods & components:
1) Put data into Amazon S3 :
Using this method manually we can put data on AWS using Amplify Storage.
import { Storage } from 'aws-amplify';

const customPrefix = {
        public: '{{YOUR_PUBLIC_FOLDER_NAME}}/',
        protected: '{{YOUR_PROTECTED_FOLDER_NAME}}/',
        private: '{{YOUR_PRIVATE_FOLDER_NAME}}/'
};

Storage.put(`filename`, `file`,{
        progressCallback(progress) {
             console.log('Uploaded : ', progress);
        },
        contentType: 'image/png',
        customPrefix: customPrefix  // For Customize path
}).then((result: any) => {
        console.log('Success =>', result);
}).catch((err) => {
        console.log('error =>', err);
});
This is default component for upload image using Amplify.
<amplify-photo-picker
    path="{{FOLDER_PATH}}"
    (picked)="onImagePicked($event)"
    (loaded)="onImageLoaded($event)">
</amplify-photo-picker>
2) Gets data from Amazon S3 :
Using this method manually we can get data from AWS using Amplify Storage.
import { Storage } from 'aws-amplify';

// For getting whole list from AWS.
Storage.list('{{YOUR_FOLDER_NAME}}', { level: 'public' })
    .then((result) => {
           console.log('success => ', result);
    }).catch((err) => {
           console.log('error => ', err);
    });

// For getting Single Image from AWS.
Storage.get('{{IMAGE_NAME}}', { level: 'public' })
    .then((res) => {
           console.log('success => ', res);
    }).catch((err) => {
           console.log('error => ', err);
    });

// There are Three types of levels (public, protected, and private).
This is default component for getting list using Amplify.
<amplify-s3-album
   path="{{FOLDER_PATH}}"
   (selected)="onAlbumImageSelected($event)">
</amplify-s3-album>
3) Remove data from Amazon S3 :
Delete stored data from the storage bucket.
import { Storage } from 'aws-amplify';

Storage.remove('{{IMAGE_NAME}}')
      .then((result) => {
        console.log('success =>', result);
      })
      .catch((err) => {
        console.log('error =>', err);
      });
As a result here is quick overview of the Code and Demo:
And finally GitHub demo is ready. Feel free to add comments/questions, I will be more than happy to answer if there is any doubts/problems.